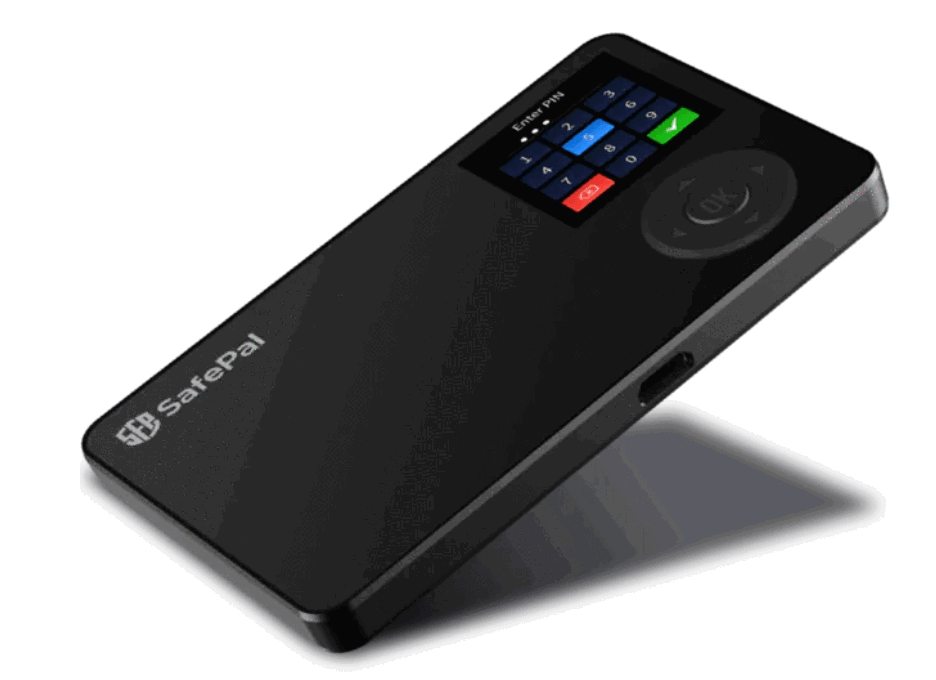
How to Set Up a SafePal S1 Hardware Wallet
Buy SafePal S1
Want to buy a SafePal S1? Buy it here!
This guide provides a step-by-step walk-through of how to set up your SafePal S1 hardware wallet safely and easily.
Note: Before you start to use the S1 hardware wallet, please make sure that you have learned some practical tips on how to keep your crypto safe from this section.
This article covers the following topics:
- Unboxing an S1 hardware wallet
- Authenticate the S1 hardware wallet
- Set up your S1 hardware wallet
- Pair the S1 device with the SafePal App
- Add your favorite coins/tokens in the wallet (Optional)

Unboxing an S1 hardware wallet
When you receive the package of an S1 hardware wallet, the first thing to do is to check whether the device is intact and not used by anyone. Here are the details that you can pay attention to:
- Check if the package is opened or damaged
- Check if the wallet gift box is intact with the anti-counterfeit stickers stuck on it
- Check whether the screen of the S1 device shows the language choosing page and guides you to the device authentication process
- Check if any of the items contained in the gift box are missing. The following shows the items contained in an S1 hardware wallet gift box:

Authenticate the S1 hardware wallet
SafePal device authentication is a security mechanism aimed to authenticate the authenticity of a SafePal device when a user receives a new SafePal hardware wallet.
There are 4 simple steps to finish the device authentication procedure. The following video shows the step-by-step process of authenticating an S1 hardware wallet.

Step 1 Start the authentication
When you start the SafePal hardware wallet, the first step is to select a language. After doing so you will see the “Device Authentication” interface. By clicking 'Next' you will see a unique QRcode shown on your S1 device.
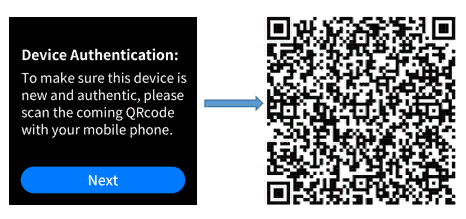
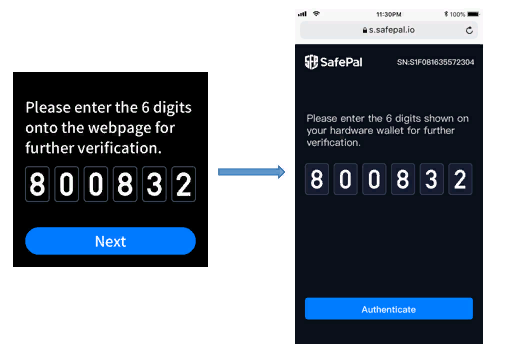
Step 2 Acquire and enter the verification code
Use the browser on your cellphone to scan the QR code shown on the S1 device. The QRcode will redirect you to a verification page. On the S1 device, click the OK button to enter the next step, where you will see a 6-digit code randomly generated by the S1 device. Enter the 6-digit verification code to the verification page opened on your mobile browser.
Step 3 Get the authentication result
By entering the verification code on the cellphone browser and click 'Authenticate', you will see the authentication result. If the result shows that the device is a genuine device and has never been used, then congratulations, your device is safe to use! If you are seeing a different result instead, please contact us for further assistance.
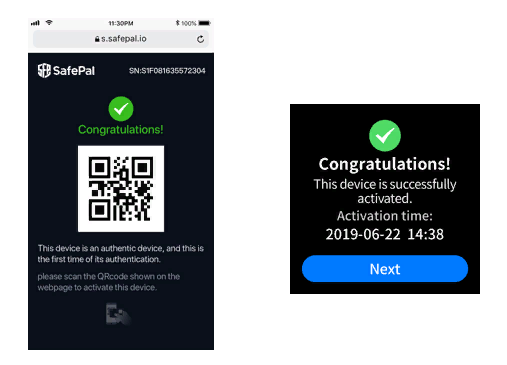
Step 4 Activate the device
On the S1 device, click 'Next', and scan the QRcode shown on the result page to activate the S1 hardware wallet. The activation process might take a few minutes. Please wait patiently. Once the activation completes, you can then go on to set up the S1 hardware wallet.
Set up your S1 hardware wallet
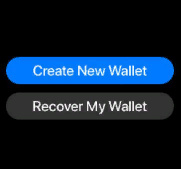
Once you have verified your S1 hardware wallet as genuine and safe to use, you can then set up the device by creating a new wallet or recovering an existing wallet in it.On the S1 device, you will see an option to choose between 'Create New Wallet' or 'Recovery My Wallet'.
- 'Create New Wallet' means that you are going to create a brand new and empty wallet for yourself.
- 'Recover My Wallet' means that you can import an existing wallet into the S1 device so that you can store and manage your existing crypto assets on the new S1 hardware wallet.
Create New Wallet
The following pictures show the step-by-step process of creating a new wallet on the S1 hardware device:
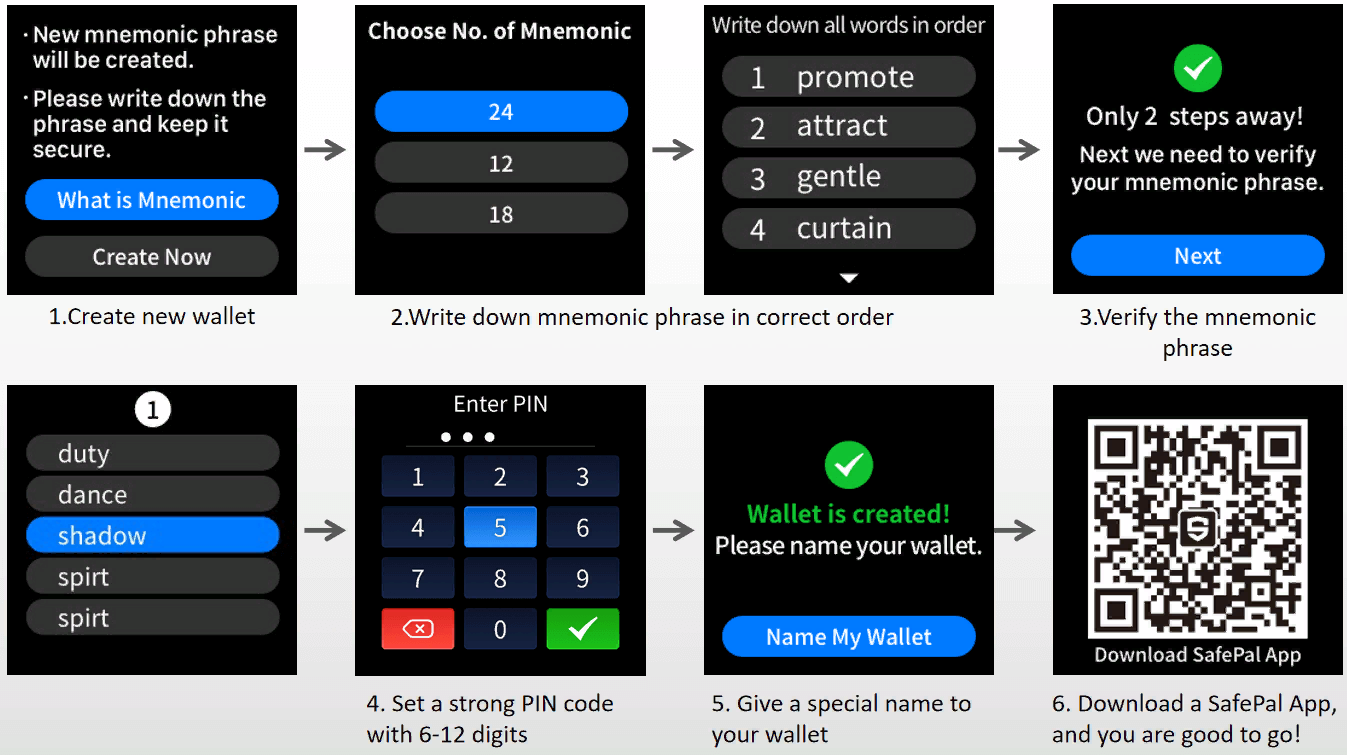
Here is a video tutorial on how to create a new wallet on an S1 hardware device:

Recover My Wallet
The following pictures show the step-by-step process of recovering an existing wallet on the S1 hardware device:
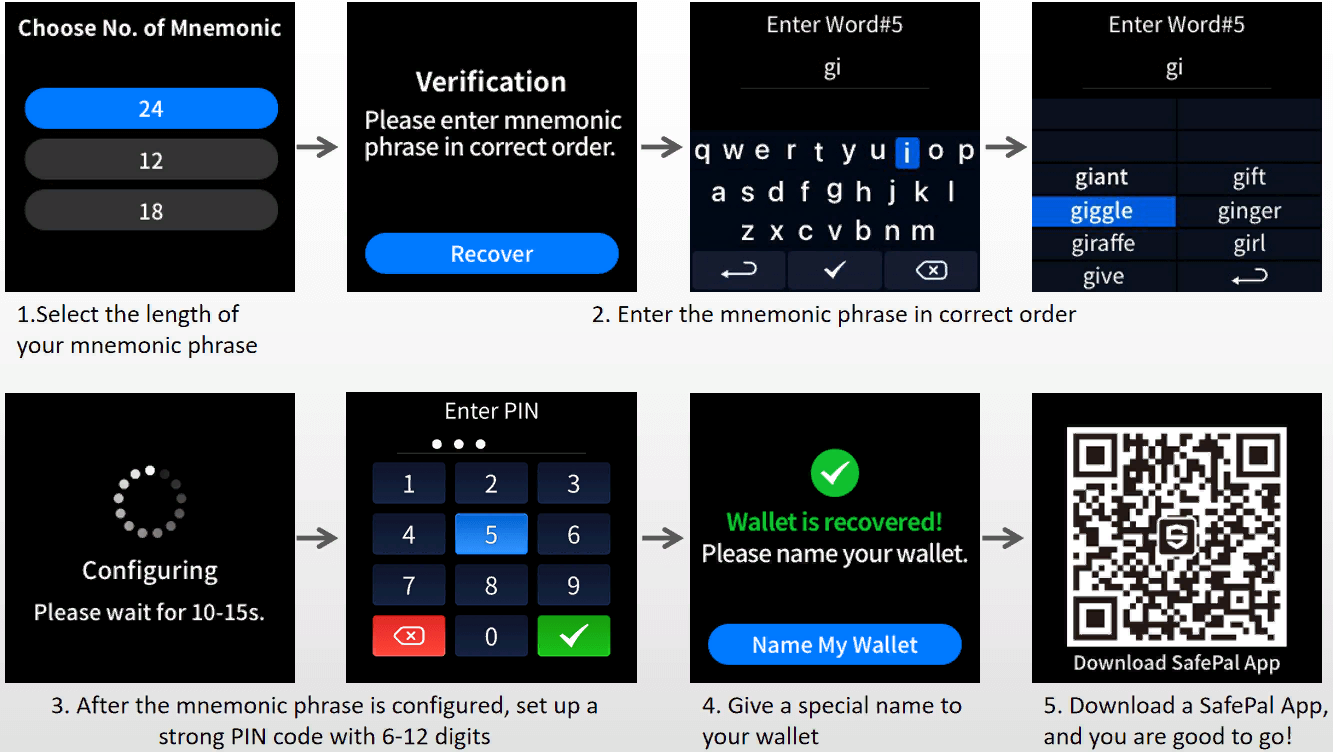
Here is a video tutorial on how to recover an existing wallet on an S1 hardware device:

Pair the S1 device with the SafePal App
Since the S1 hardware wallet is an offline device, it is not able to communicate with the internet or blockchain to send or receive crypto. For it to sign a crypto transfer or authorize a DApp login, an S1 hardware wallet needs to be paired with the SafePal App so that the SafePal App can broadcast the crypto transfer or pull data from the blockchains or DApps. Thus your private key never leaves the offline S1 device and is safely protected.Therefore, after setting up the S1 hardware wallet, the last step is to pair the S1 device with the SafePal App.
Step 1 Download the SafePal App
You can download the SafePal App either by visiting this link or scanning the QR code below:

Step 2 Configure the security settings of the SafePal App
If this is the first time you use the SafePal App, it will take you a few minutes to complete the security settings on the SafePal App, including setting a Security Password, fingerprint, and Pattern. Follow the instructions on the application and it should be a fairly easy process.
Step 3 Enter the hardware wallet pairing process
After setting up the SafePal App, you can then choose to add a Software Wallet or a Hardware Wallet. In this case, choose 'Hardware Wallet'.Read the instructions on the SafePal App, and click 'Next'.
Step 4 Use the S1 device to scan the QRcode on the SafePal App
By entering the pairing process, you will see a QRcode on the SafePal App. Open the S1 hardware wallet, and click 'Scan' on the device. Then use the S1 device to scan the QRcode shown on the SafePal App. By doing this, the App can successfully build a connection with the S1 device. Then enter the PINcode on the S1 device to authorize the connection.
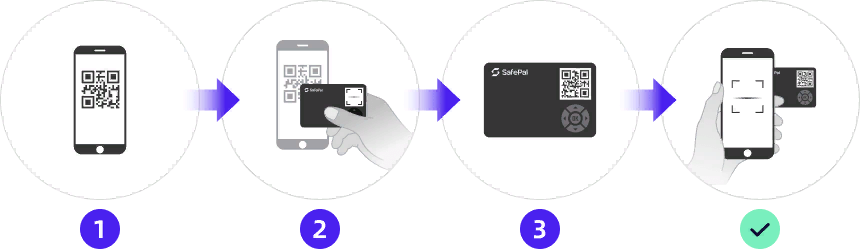
Step 5 Use the SafePal App to scan the QR codes on the S1 device and pair them together
After entering the PINcode on the S1 device, the device will display a set of dynamic QR codes on its screen. On the SafePal App, click 'Next' and it will open the cellphone camera. Use the SafePal App to scan the dynamic QR codes on the S1 device. Once the scan completes, the S1 device and the SafePal App are paired!
Add your favorite coins/tokens in the wallet (Optional)
If you have recovered an existing wallet into the S1 hardware device, by pairing the SafePal App and the S1 device together, you can already view the coins and tokens on the SafePal App. In this case, there is no need to manually add the coins or tokens again because the App will automatically pull the balances of the crypto assets from the blockchain.If you have created a new wallet on the S1 device and paired the S1 device with the App instead, then you might want to manually add some coins or tokens into the wallet so that you can start receiving crypto using the wallet.Tips:
- You can view all of the cryptocurrencies supported by SafePal S1 hardware wallet from here.
- Each S1 hardware wallet comes with the default signing algorithms of BTC, ETH, and BNB (BEP2). This means that every new S1 hardware wallet, in default, is able to sign a transfer of BTC, ETH, BNB, ERC20 tokens issued on Ethereum and BEP2 tokens issued on the Binance Chain. If you own any of these coins or tokens in the wallet, you don't need to manually add them to the S1 device anymore.
- If you are adding a token (not a coin), you only need to add the native coin of the blockchain where the token is issued to the S1 hardware wallet.
- Example A: If you have added ETH in the S1 hardware wallet, it means that the S1 device has already activated the signing algorithm for all the ERC20 tokens as well, and you don't need to manually add any ERC20 token issued on Ethereum to the wallet anymore.
- Example B: If you want to add USDT (TRC20) into the asset list, simply add TRX coin to the S1 hardware wallet, then you are able to sign any transfer of a TRC20 token with the S1 hardware wallet.
The following shows how to add a native coin to the S1 hardware wallet, using TRX as an example:
Step 1 Open the SafePal App and click the edit button as shown in the picture below
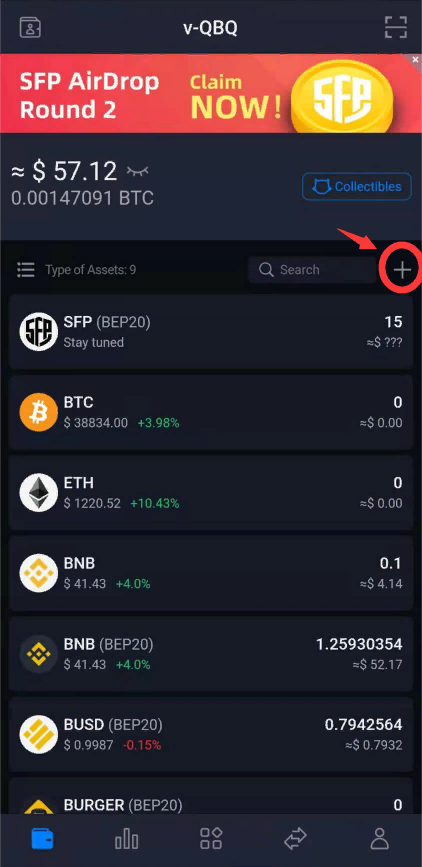
Step 2 Select all the coins you want to add, and click 'Add Coin' at the bottom
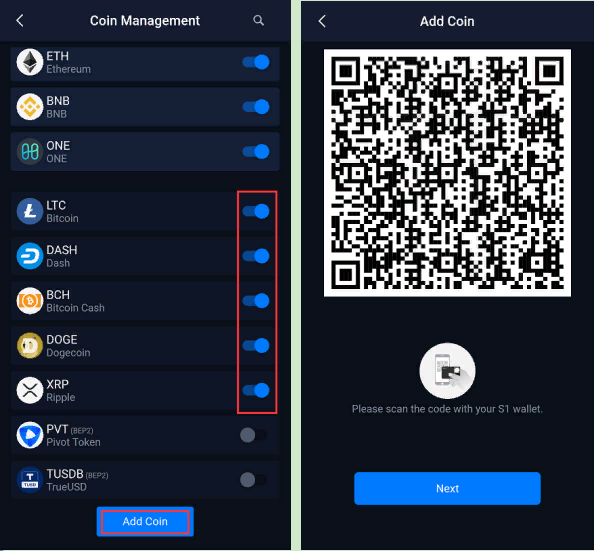
Step 3 Scan back and forth between the App and the S1 hardware wallet (just like how you pair the device and the App together in the last step) so that the data is correctly synchronized between the App and the device.
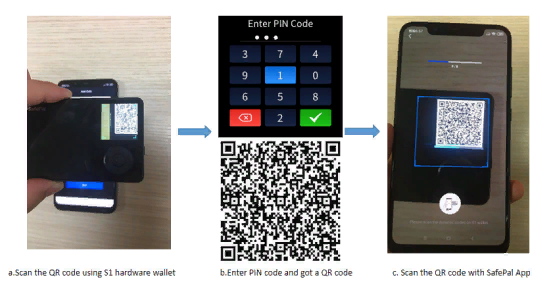
Step4: Then the coins are successfully added and you can view them in the 'Asset Management' tab on the S1 device.

3 Tips to Keep Your Assets Secure
Always keep your mnemonic phrase in secure locations.
Mnemonic phrase is the only proof of ownership for your crypto assets. Once lost, nobody including the SafePal team could help to recover your assets. Please store the phrase in offline and secure places, such as a safe box.Set a strong PIN code
PIN would be used as your signature when you need to process a transaction. Please avoid to use weak PIN codes such as “123456” or “666666”. Try to set a complex and strong PIN code instead.
Reset wallet when you stop using this device
In cases when you don’t need to use this device anymore, please remember to wipe all data by resetting wallet (Settings—>Reset Wallet). Once reset, you can only recover the wallet via correct mnemonic phrase. Don’t forget to back up mnemonic phrase before reset.
Attention!
- The device is meant to function within the temperature from 0℃ to 55℃ (32℉ to 131℉), and be stored within the temperature from -20℃ to 60℃(-4℉ to 140℉).
- Improper charging may lead to explosion of the device, please charge with 5V/1A adapter.
- Do not use irritating chemical solvents for cleaning. Please clean with a damp paper towel or soft cloth.
- Keep away from fire.
- To protect the environment, do not throw the device in the trash.
- Do not try to open, change or repair the device by yourself.