D'CENT User Guide: Unboxing & Initial Setup
D'CENT Biometric Hardware Wallet is a one of the most advanced cold hardware wallets for cryptocurrencies. The distinctive features of this wallet are: Biometrics Authentication, Multiple cryptocurrency support, Secure Private Key Management, State of the art Security, Large OLED Display, Back Up & Restoration.
Read D'CENT Review here.
Buy D'CENT Biometric Wallet:
GET 30% - 40% OFF!
Only for visitors of the HardwareWallets-Guide.com website

D'CENT Biometric Wallet$109 |

D'CENT Biometric Wallet 2X Package$189 |
Basic environment setup
- Initial Setup
- Connect with Android Phone
- Connect with Android Phone
I. Initial Setup
Creating new wallet on the Biometric Wallet
Before you begin:

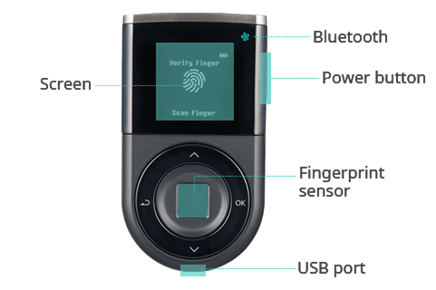
D'CENT Biometric Wallet user interfaces
D'CENT Biometric Wallet is equipped with 4-buttons for navigation.
- Up(∧)/Down(∨) buttons : move between selectable items or change value of numbers or characters.
- OK button : confirm selected item or input value.
- Back button : move to previous menu or cancel the current input value.
Step-1 : Select Language & Create Wallet

Power on D'CENT Biometric Wallet
To power on the device, press and hold the power button for 3 seconds, which is located on the right-side.
Select Language
Use ∧(Up) or ∨(Down) button to select your language and press OK button.
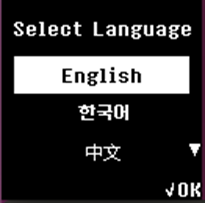
Language support : English, Korean, Chinese, Japanese, Spanish
After setting up your cold wallet, you can change the Language from the Setting menu.
Select "Create Wallet"
To create a new wallet, select "Create Wallet" from the menu.
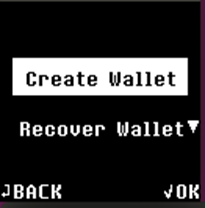
Selecting "Create Wallet" will create a wallet from a new private key. If you wish to recover an existing wallet, please refer here.
Step-2 : Register PIN & Fingerprint
To protect accessing your wallet, register a new PIN and your fingerprint.
Firmware below v.2.5.5 only supports 4-digit PIN length.
Register a new PIN (4 to 8 digits) Use ∧(Up, increase number value) or ∨(Down, decrease number value) button to input your PIN.
Pressing the OK button on the hardware wallet will confirm the input.
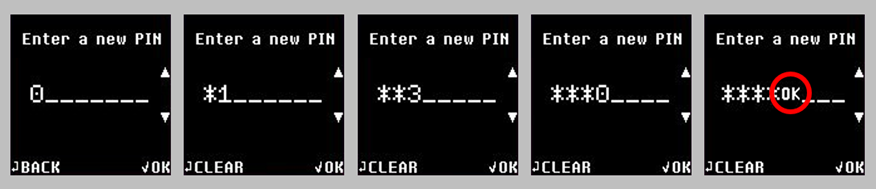
When you have entered 4 digits, you will see 'OK' text on the screen. If you wish to set your PIN to 4-digits long, then press the OK button on the hardware wallet.
If you wish to set the PIN to a longer digit, you can change the ('OK' text) value on the screen by pressing the Up or Down button. Your PIN can be set to 4, 5, 6, 7, or 8 digits long.
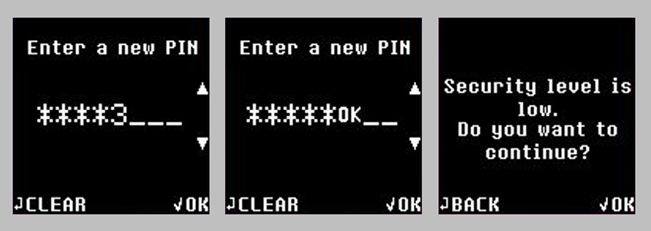
If you ever see a screen with a warning on 'Security level is low', this means the PIN you have entered is a weak password. If you wish to use such a PIN, press the 'OK' button on the hardware wallet to continue.
Verify your PIN
Re-enter the same PIN you have set in the previous step to verify for correctness.
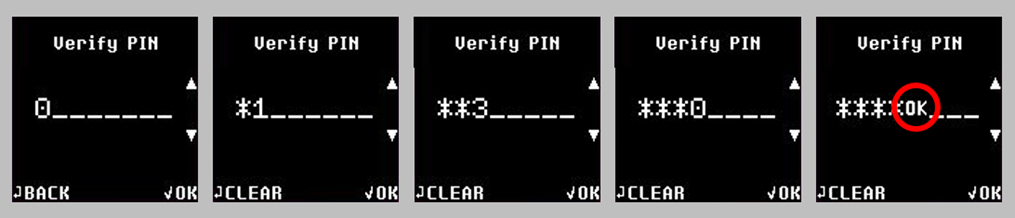
If the PIN numbers do not match, you will have to restart the PIN registration.
After setting up your cold wallet, you can change the PIN value from the Biometric Wallet Setting menu.
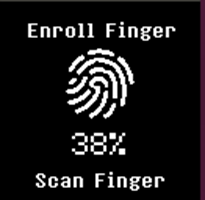
Register Fingerprint
1) To register your fingerprint, touch your finger on the sensor to scan.

Fingerprint sensor is located in the middle of where the navigational buttons are located. Check the location of fingerprint sensor.
2) Slightly change the angular positioning of the same finger when scanning and repeat until 100% (8 correct scans) is reached.
Verify Fingerprint
Scan your fingerprint one last time to verify registered fingerprint.
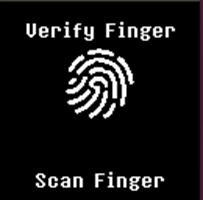
※ If the fingerprint does not match, you will have to restart the Fingerprint registration.
※ If re-registering fingerprint, try using a different finger instead.
※ If unable to register your fingerprint for any reason, you will be given an option to skip the fingerprint registration. Fingerprint can be registered from the Setting menu at a later time.
※ If fingerprint verification fails, your fingerprint will not be saved.
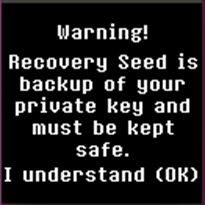
Step-3 : Write down the recovery seeds Before you begin - What are recovery seeds(Mnemonic code)?
Recovery seeds are the codes that you use to recover your wallet. If your D'CENT Cold Wallet is ever lost, stolen, damage, or wiped and you no longer have any access to your wallet, using recovery seeds is the only method of recovering your existing wallet.
You MUST write down all the recovery seeds on the Recovery Card and keep it secured in a safe place.
Recovery seeds required for recovering your existing wallet is shown only once during initial setup. If you lose your recovery card, there is nothing we can do to help you recover your funds. You are solely responsible to secure your recovery card in all events.
If you lose your recovery card, there is no other way to recover your existing wallet and your funds will be lost.
Write down the recovery seeds from the lists
1) Press OK button only when you have fully understood the WARNING notice.
2) Write down all the recovery seeds (words) shown on the screen of your cold wallet. Press OK button to see the next list of words.
There are 6 lists with total of 24 words and each list has 4 words shown. Make sure you write them down correctly and in the exact same order as show
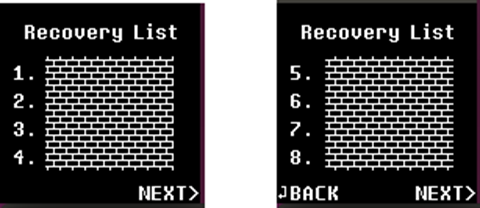
3) When you have written down all 24 words, press OK button to continue.

Recovery Seeds Verification
You will be asked to take a simple quiz. From the 24 words listed, you will be asked to enter 2 randomly selected words to complete the verification.
From firmware version 2.9.2 or higher, the quiz will ask the user to enter all 24 words for verification.

Quiz example
Enter the correct word that corresponds to the question asked.
Enter the first 3 characters

※ How to input : Use the Up/Down buttons - ∧(increase value from a to z) or ∨(decrease value z to a)
When you have selected the first character, press "OK" button to enter the value. Repeat entering second and third characters.
Finding suggestion from the list shown
From the list of words available, select the correct word using ∧/∨ buttons and press "OK" to choose as the answer.

※ If you find yourself having written down the words incorrectly, you can press "Back" button to revisit the recovery seeds from the lists for review.
Step-4 : Completing the Initial Setup
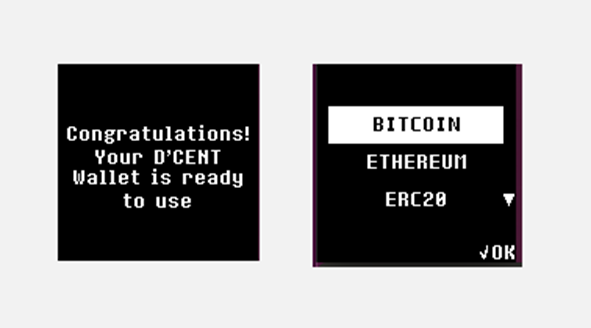
Congratulation, you have passed the quiz and your new wallet is created. From your cold wallet, you can check the lists of coin accounts available. You are now ready to use your new wallet together with the mobile application.
You can find the complete list of cryptocurrency assets supported on D'CENT Biometric Wallet from https://dcentwallet.com/SupportedCoin
Check for the latest Firmware
Once you have completed the Initial Setup, make sure to visit D'CENT Wallet homepage and check for the latest firmware available. Newer version of firmware may include additional support for cryptocurrency assets and new wallet features. More information on firmware update can be found from here.
II. Unboxing
Checklist for newly purchased D'CENT Biometric Wallet
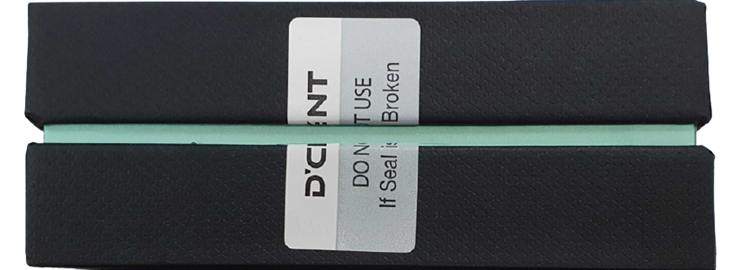
Check external package
Make sure the package Seal(Authenticity Sticker) is intact on both sides Before you use the wallet, you must check the product is authentic.

Normal package
Abnormal package
Double-check that the package is not damaged and make sure that the Seal is not torn or missing.
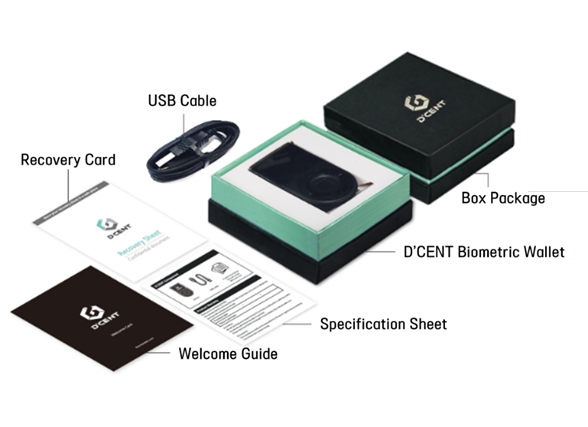
Inside the package
A package with D'CENT Wallet contains the following:
- D'CENT Biometric Wallet (main device)
- USB cable (USB 5-pin)
- Mnemonic code card for Recovery
- Welcome Card
- Specification sheet